Fox 3.2 Live Valve Tacoma: What $8,500 Gets You [UPDATED]
Install complete, and the first 500 miles are on the shocks, split between a road trip up north and a small stretch of dirt off Bulldog Canyon closer to home. Out of the box they feel significantly smoother than the Kings, and floatier too, which is what stock Fox valving does before any dialing in. Real test so far was high-speed work on heavily rutted forest roads off FR130 near Sitgreaves National Forest, where Live Valve earned a 10 out of 10. Biggest difference day to day is on-road: corners at much faster speeds, less body roll, a significantly more comfortable ride. Two things need sorting. Up front the truck sits lower than it did on the Kings with their 600-pound springs and rubs the inner fender on both sides, likely because a steel bumper and winch outweigh what Fox's factory-spec springs plan for. Out back the spring rate still needs matching to how this truck actually sits. Get the valving dialed and the springs set right and these should be a slam dunk.
My previous setup was no slouch. Custom valved Kings from Arizona Chassis Engineering with reservoir adjusters. ACE built the valving specifically for my truck, and the reservoirs gave me some level of adjustment for compression. It was a proper setup and it performed well. But every time the terrain changed, the valving stayed the same. And my usage patterns are all over the place.
Some weekends I’m in Johnson Valley trying to keep up with Jay and his long travel Tundra. Other days I’m crawling rocks with older Tacomas near Table Mesa. Last January I drove 20 hours straight to Bozeman, Montana in -15 degree temps to pick up a Go Fast camper. Tuesday I’m racing across town to drop the kids at football practice. Sometimes I want soft and comfortable at 85 on the freeway. Other times I want every bit of damping the shocks can give me.
With the Kings, switching between those environments meant getting out of the truck and turning a dial on each shock. Or just living with whatever compromise that tune gave me. Nothing on the aftermarket lets you toggle between desert racing mode, rock crawling mode, highway mode, and kid-shuttle mode from inside the cab while driving. That’s what Live Valve claims to do.
SDHQ has since pulled the Kings and installed Fox’s 3.2 Live Valve system, documenting the full build along the way. Before that happened, I wanted to understand every single component in the box, what it does, and whether the engineering justifies a price tag that’s nearly double what most people spend on a complete suspension setup.

Fox published two Tacoma-specific install videos on their YouTube channel with a combined 780 views at the time of writing. Almost nobody had seen them. I pulled both apart frame by frame to answer that question. Both are embedded below for reference.
What’s in the kit
Five categories of hardware. Four shocks, one brain, one sensor, one controller, and a lot of wiring.
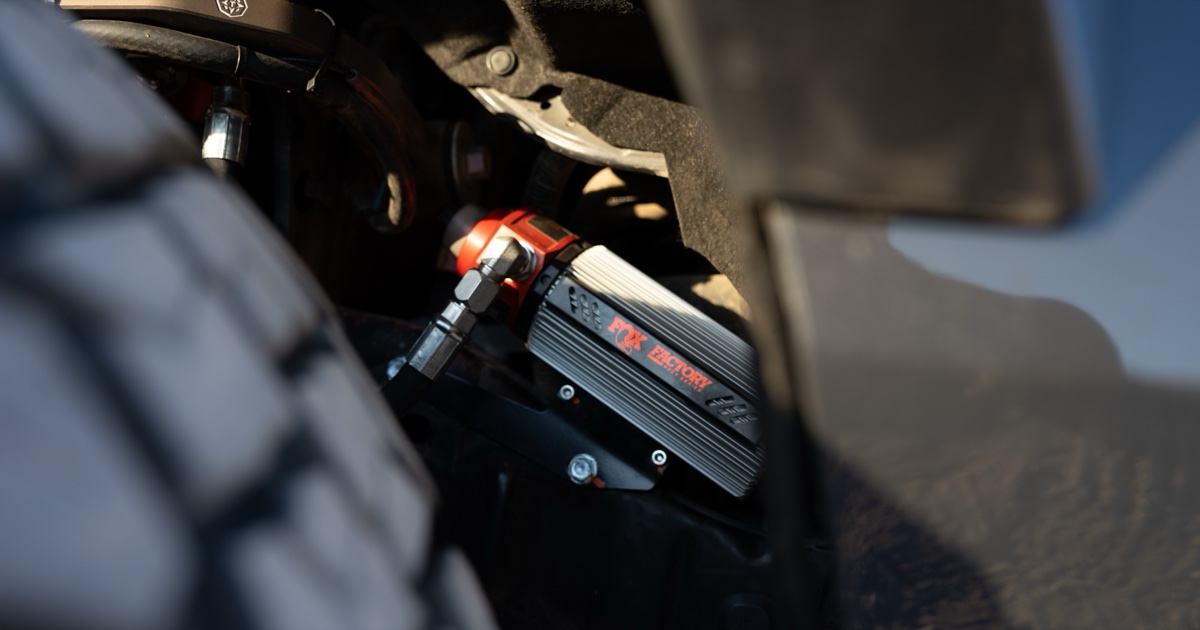
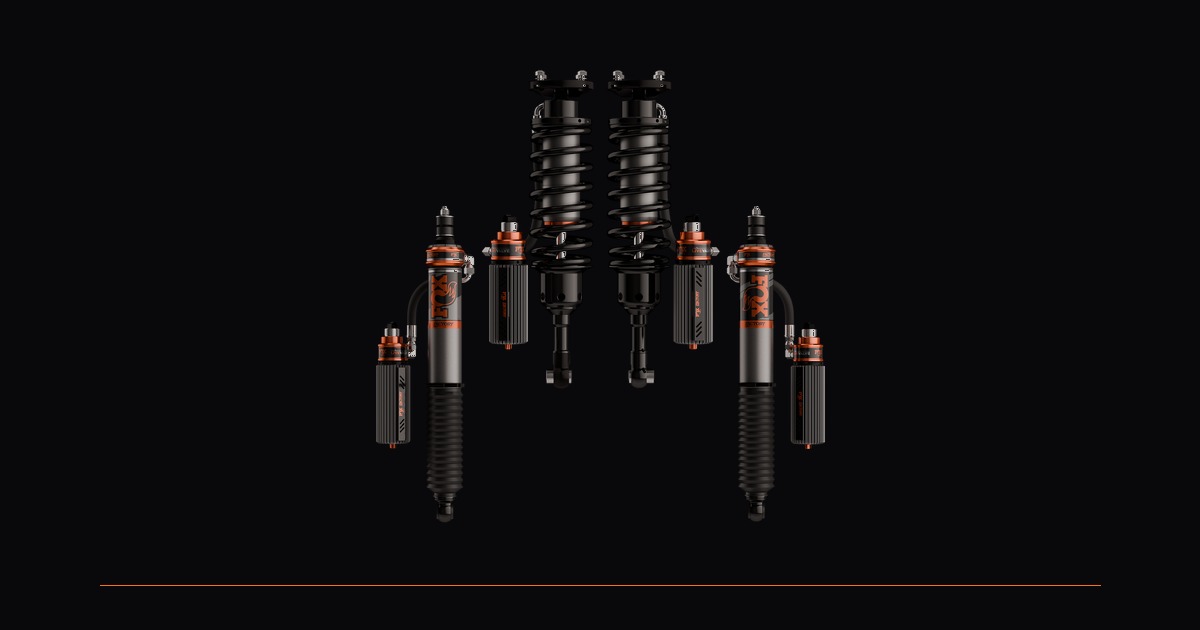
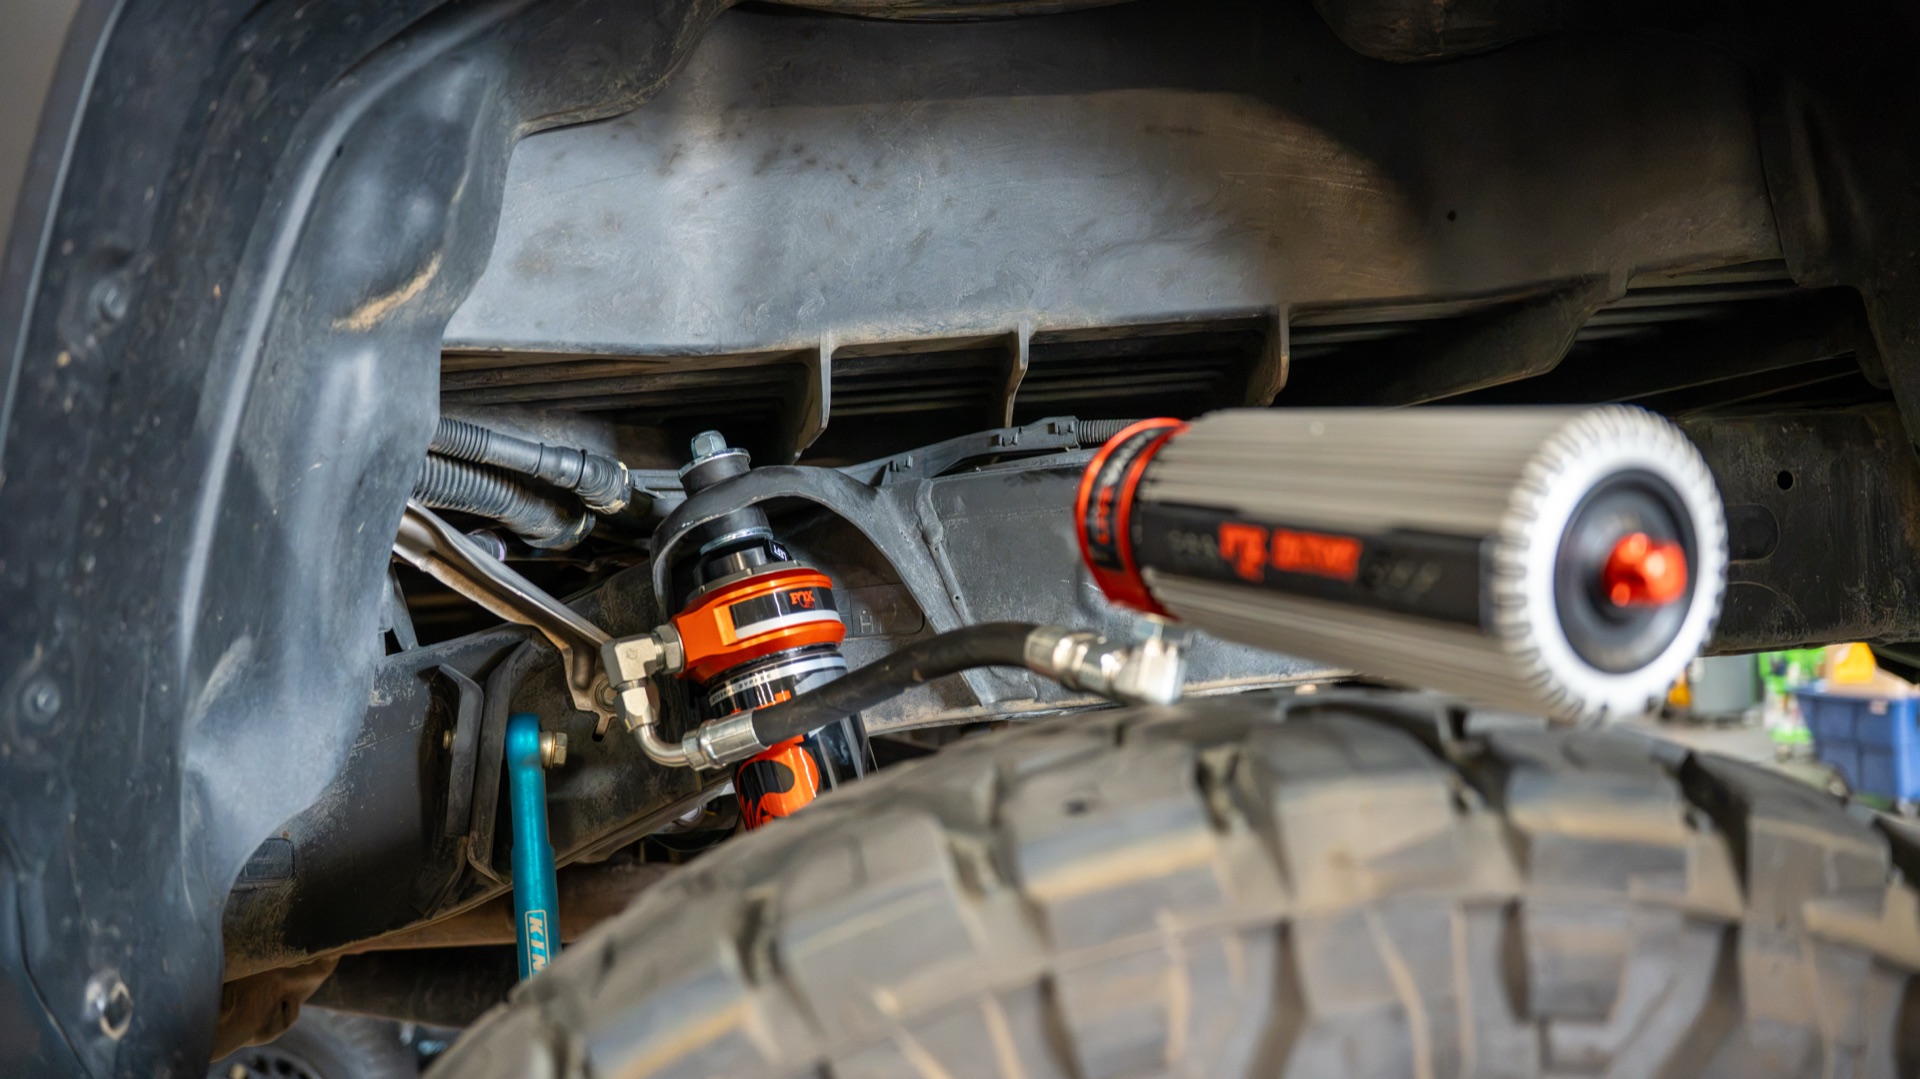
Factory Race Series 3.2 Internal Bypass Coilovers (front pair). Internal bypass means the shock body has bleed holes drilled through the inside wall around the ride zone, the middle stretch of the stroke where the shock spends most of its time. Around ride height, fluid passes freely through those holes and damping stays soft. As the piston travels deeper into compression or further into rebound, the bleed holes terminate and fluid has to go through the main piston, ramping damping up at the extremes. Fox calls this position-sensitive damping, and it’s how their Baja desert race shocks work: soft on small hits in the middle of travel, firm at the bottom of the stroke, built into the physical design of the shock body. Each front shock also has an electronic solenoid valve mounted on the body. This solenoid controls compression damping force in real time by restricting or opening fluid flow through the valve body.


Factory Race Series 3.2 Internal Bypass Shocks (rear pair). Same internal bypass architecture. Stem mount with rubber bushings on top, eyelet on bottom. Each gets its own solenoid, same as the fronts. Four shocks, four solenoids, four corners of independent damping control.
ECU, the Electronic Control Unit. Mounts under the driver’s side carpet on a bracket that lines up with the front seat bolt holes, so the seat bolts thread through the bracket when the seat goes back in. Houses Fox’s proprietary Live IQ algorithm. Receives data from the IMU and CAN bus, calculates the damping force needed at each wheel independently, and signals each shock’s solenoid. All in fractions of a second.
IMU, the Inertial Measurement Unit. A small sensor module that mounts on a bracket inside the center console with double-sided tape. Contains accelerometers and gyroscopes that measure the vehicle’s rotation in three dimensions: pitch (nose tipping up or down), yaw (the truck rotating left or right, like the rear end kicking out), and roll (the body leaning side to side). White cover faces downward, connector pointed away from the mounting tabs. Torqued to 70 in-lb.
CAN Sensor. A small reader that taps into the Tacoma’s CAN bus, the vehicle’s internal data network. Reads speed, steering wheel angle, brake pressure, and throttle input (torque request). Non-destructive install: it clamps onto two wires (pin 25 for CAN High, pin 26 for CAN Low) on a gray 34-pin connector behind the center console. No wire cutting. No splicing.
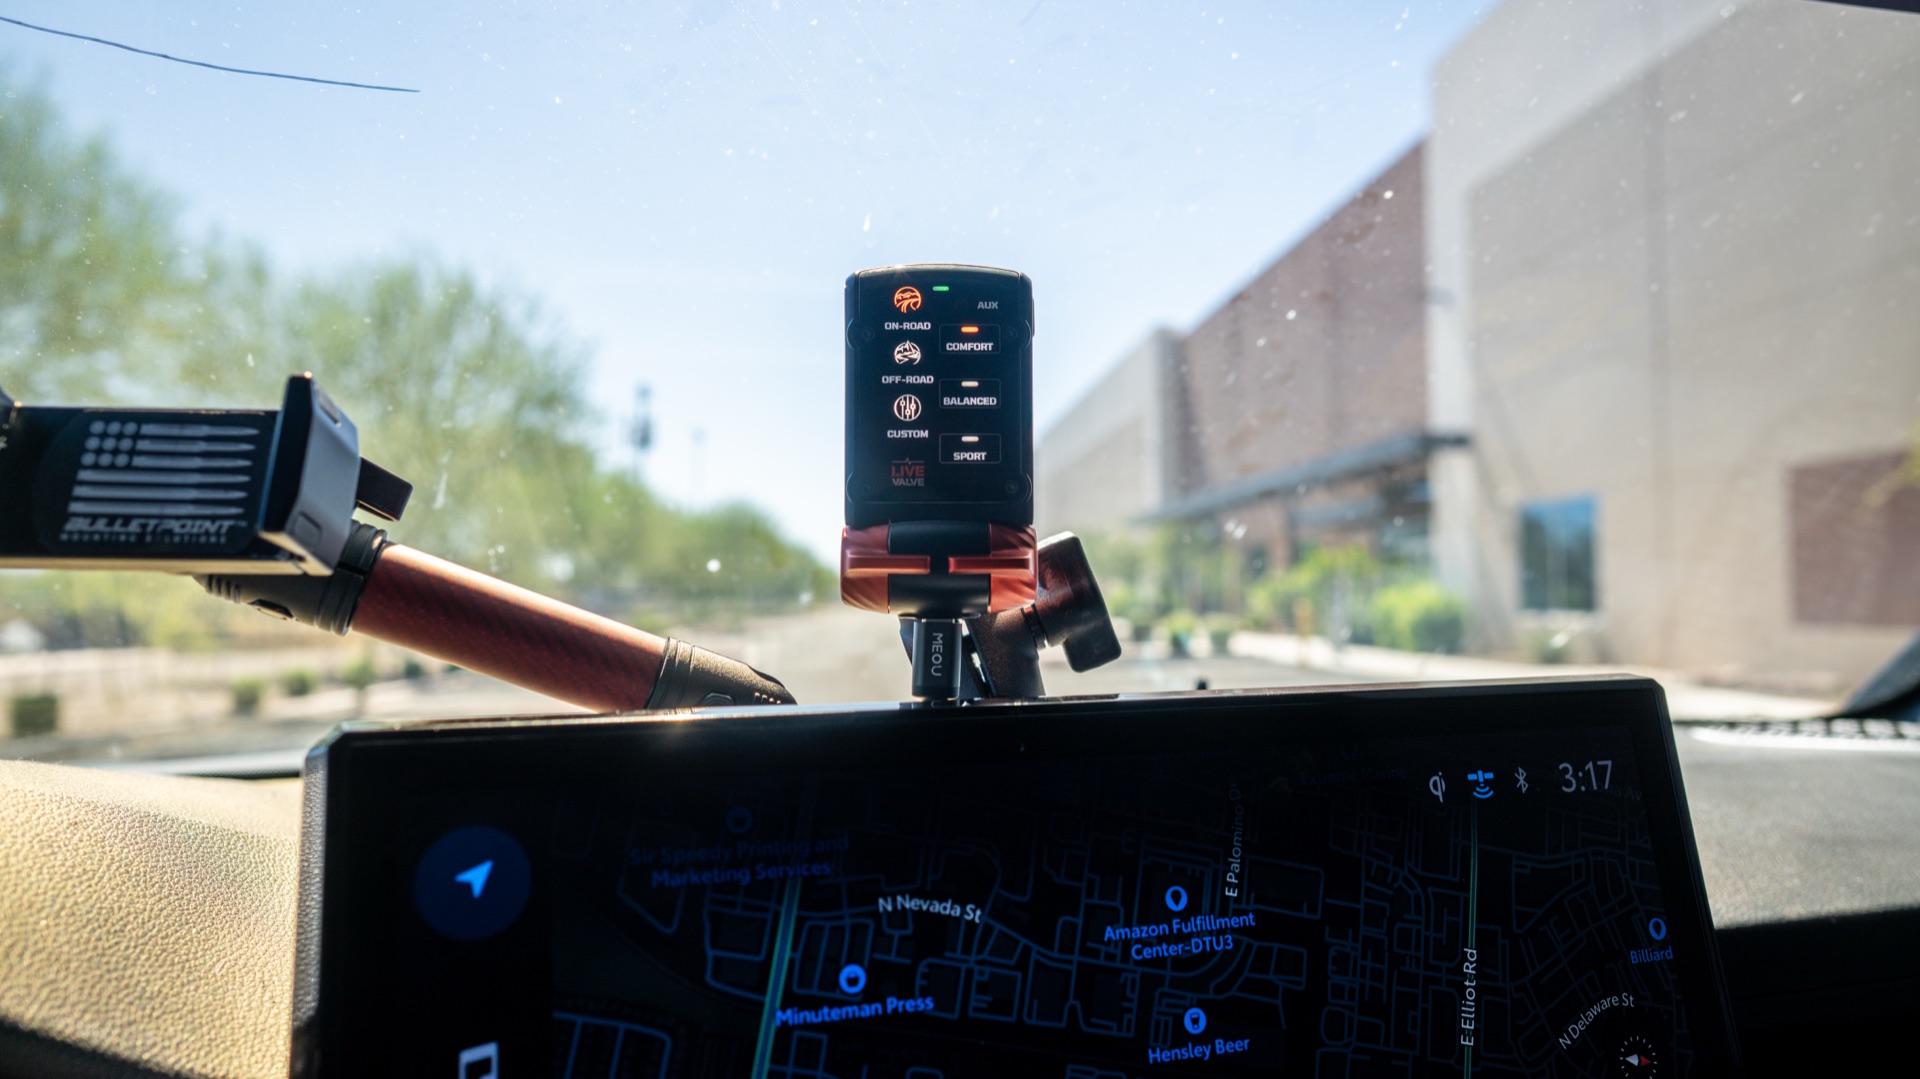
Mode Selector. A red dial that mounts on a ball mount inside the cab. Fox recommends left of the steering wheel. Three modes: On-Road, Off-Road, and Custom. Connects to the ECU via Bluetooth. Pairing procedure: press the start/stop button 11 times with your foot off the brake.
Wiring loom. A single main cable run with labeled branches for every connection. FLC (front left coilover), FRC (front right coilover), RLC (rear left coilover), RRC (rear right coilover), IMU, CAN, sensor, touch point, power, and ignition. Includes grommets, zip ties, a 3-amp fuse, and an ignition fuse tap for slot F5.
How the system actually works
Live Valve runs a closed loop. Sense, interpret, adapt. Sensors sample 400 times per second. Damping adjusts as fast as conditions demand.


Sense. IMU measures how the chassis is moving through space: pitch, yaw, and roll. CAN sensor reads what the driver is doing (steering, braking, throttle) and how fast the truck is moving. Combined, the system knows both what the terrain is doing to the truck AND what the driver is asking the truck to do.
Interpret. Live IQ takes all that data and calculates the exact compression damping force needed at each individual shock. Not just “softer” or “stiffer,” but a specific force value per corner, per moment. It accounts for brake dive, acceleration squat, cornering load transfer, high-frequency washboard chatter, G-outs, and landing impacts.
Adapt. Each shock’s solenoid adjusts compression damping in the moment. Four independent adjustments, hundreds of times per second. Faster than any human could twist a dial.
Live compression, not live valving
Worth being precise about the name, because most coverage gets this wrong. Live Valve does not change your valving. It modulates the compression circuit, and only the compression circuit.
Inside each shock, the shim stacks and the internal bypass ports set the base damping character, including all of the rebound. That tune is mechanical and fixed, exactly like a passive shock. What the solenoid does is open and restrict a fluid path on the compression side in real time, raising or lowering compression force on top of that fixed base. Fox describes it the same way on their own truck Live Valve page: the ECU signals desired compression at each shock, and the rebound circuit stays separate and untouched. Fox’s higher-end X2 race shocks, like the ones on the Polaris RZR, do adjust compression and rebound independently, but this Tacoma internal-bypass kit is compression-only.


So the base tune still decides how the truck rides. If the valving is wrong for your weight and how you drive, no amount of live compression makes it right. You would have to physically revalve the shock, a teardown, not a menu setting. Live Valve makes a good tune adaptive. It cannot turn a wrong tune into a right one.
This isn’t new tech
If this sounds like race technology, it is. Fox has run semi-active damping in Baja desert racing and Ultra4 competition for years. Ford put Live Valve in every F-150 Raptor starting in 2019, and Bronco Raptor owners have had it since 2022. Polaris runs it on the RZR Pro R Factory. Results speak for themselves in all of those applications.
What’s new isn’t the technology. What’s new is that Fox is selling it as a bolt-on aftermarket kit for vehicles that didn’t come with it from the factory. Tacoma owners can now buy what Raptor owners got standard. The landing behavior that makes Raptor jump videos look effortless runs on the same hardware. Fox lists jumps among the inputs Live IQ accounts for alongside G-outs and brake dive, and reviewers describe the system softening compression as the chassis goes light. The mechanism isn’t called out as a published spec for the aftermarket kit, but the architecture is the same one that’s been catching Raptor landings since 2019.
Here’s the part Tacoma owners miss: no Tacoma comes with Live Valve. A TRD Pro ships with Fox QS3 shocks you adjust by hand, three positions, and a Trailhunter runs Old Man Emu. Neither is electronic. This kit is the only way to put Live Valve under a Tacoma.
On trucks that do come with it, the job is easier. A Ford Raptor already carries the Live Valve brain and wiring from the factory, so Fox’s Raptor shocks plug straight into the existing system. This Tacoma kit is the hard version: a complete standalone setup with its own ECU, IMU, wiring loom, and a read-only tap into the CAN bus, bolted onto a chassis never designed for it. Ford also builds its system into the truck’s drive modes, while Fox’s kit runs alongside the Tacoma’s computer rather than inside it, with its own Live IQ tune and the Fox Connect app for over-the-air updates that factory trucks don’t hand their owners.
For $8,500, you’re getting the same core architecture that’s been winning races and selling $75,000 trucks. Just packaged for a platform that’s never had access to it before.
What the sensor data actually enables
This is where the $8,500 starts making sense. Each sensor input gives the system a specific capability that passive shocks can’t replicate.


Brake pressure data means the system knows you’re decelerating before the nose dives. It increases front compression damping to resist dive and keeps the chassis level under hard braking. Your headlights stay pointed at the road, not the ground. On a trail, that means controlled descents where the front suspension isn’t collapsing under its own weight transfer.
Throttle input (what Fox calls torque request) lets the system increase rear compression damping under acceleration to prevent squat. Launch out of a wash crossing or pull away from a stoplight, the rear stays planted instead of squatting down and unloading the front tires.
Steering angle data is where cornering control comes in. Turn the wheel and Live Valve increases compression damping on the outside shocks to resist body roll. Harder turn, more resistance. Straighten out, it relaxes. This happens independently at each corner, so a sweeping high-speed turn and a tight low-speed switchback get different damping responses.
Vehicle speed changes everything about how the algorithm behaves. At highway speed, Live Valve runs lower compression damping so small pavement imperfections get absorbed quietly. At crawling speed, it softens to allow maximum wheel travel and droop so your tires stay on the ground over uneven terrain. At desert speed, it firms up compression to resist bottoming out and manages the rapid succession of impacts across washboard and whoops.
Pitch, yaw, and roll from the IMU give the system a real-time picture of how the chassis is rotating in three dimensions. Pitch is nose up or nose down, like cresting a hill or diving into a descent. Yaw is the truck rotating flat, like the rear end stepping out on loose gravel. Roll is side-to-side lean, like an off-camber trail pushing the truck sideways. For each of these, Live Valve adjusts compression independently per corner to counteract the load transfer. On an off-camber section, it stiffens the uphill shocks and softens the downhill side to keep the truck planted instead of tippy.
Vertical G-force measurement lets the system detect big impacts, jumps, and G-outs. Drop off a ledge and the shocks reduce compression damping to absorb the landing instead of kicking back at you. Hit a whoop section at speed and the system tracks each impact individually, adjusting compression between every single hit in the series.
All of this happens at the same time. Every sensor feeds data simultaneously, and Live IQ weighs all of it against each other to calculate damping at four independent corners. Not one setting for the whole truck. Four independent corners, sensors reading 400 times per second, damping responding in milliseconds.
Install: shock swap
Fox’s official shock install video covers the mechanical side in about 6 minutes.
Front removal: pull wheels. Disconnect tie rod end and sway bar end link. Secure the upright. Disconnect upper control arm. Disconnect ABS wire. Support the lower control arm with a jack, then unbolt the lower shock bolt. Remove the four top hat nuts (don’t touch the center nut, it’s under spring load and holds the assembly together). Stock shock comes out.
Front install: apply thread lock to the top hat bolts and lower shock bolt. Drop the Fox coilover into the coil bucket with the reservoir hose fitting pointed toward the front of the truck. Loosely install top hat nuts. Install lower shock bolt, using the under-hoist to line up the eyelet with the lower control arm. Torque top hat nuts to 24 ft-lb. Torque lower bolt to manufacturer spec. Reconnect UCA, ABS wire, tie rod, sway bar. Thread lock on everything.
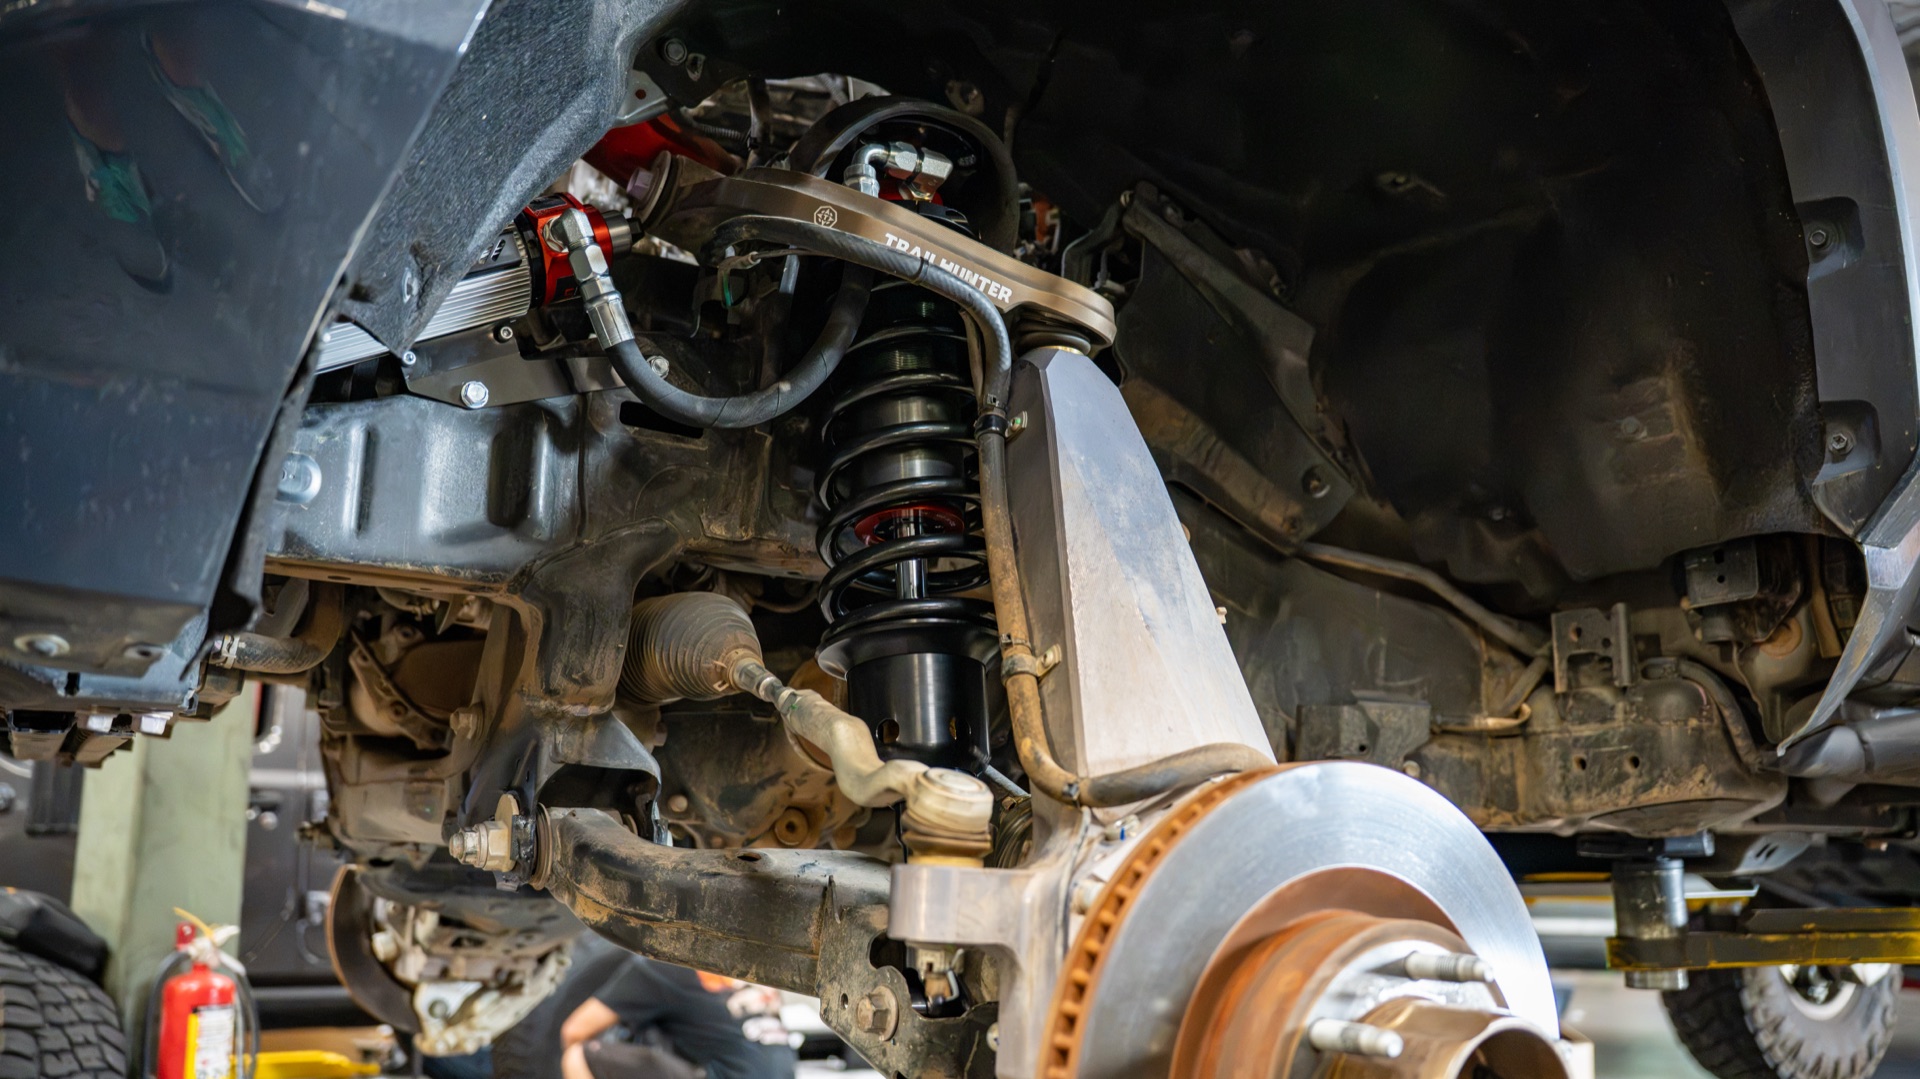
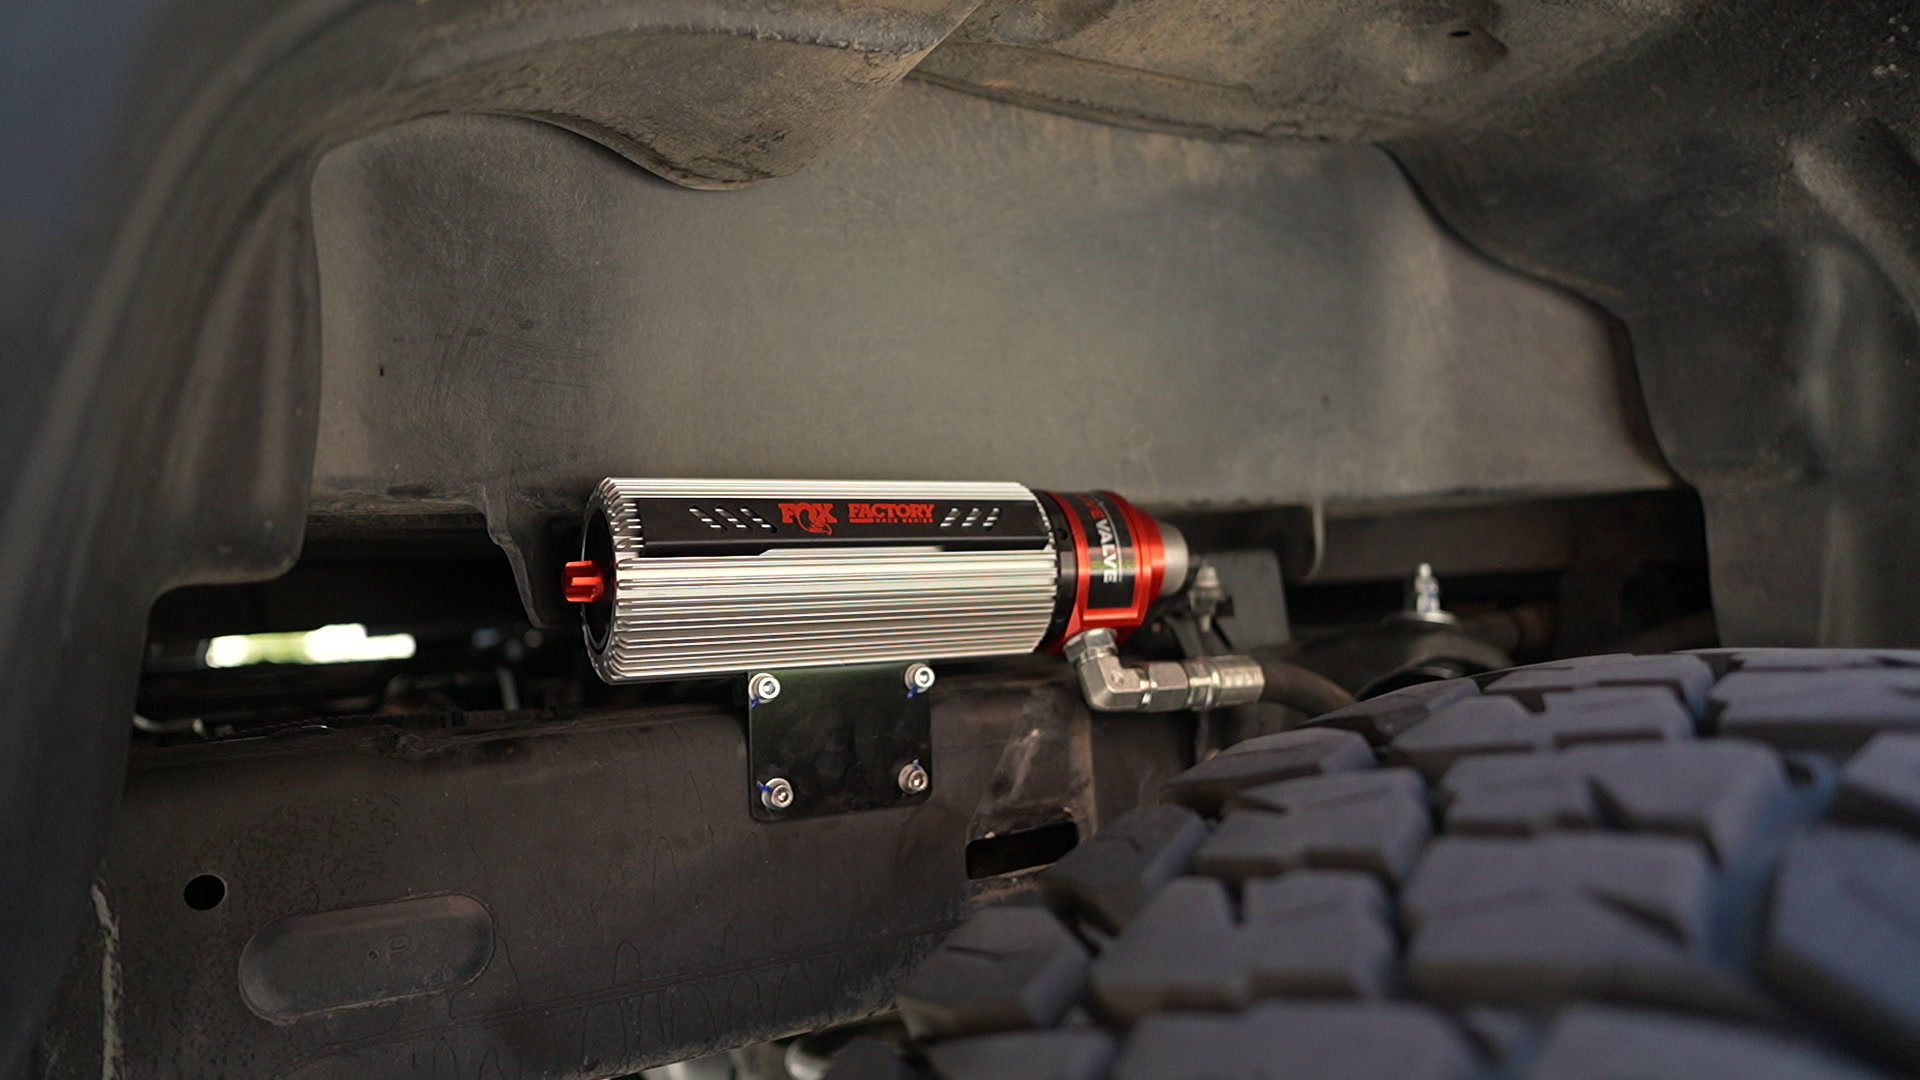
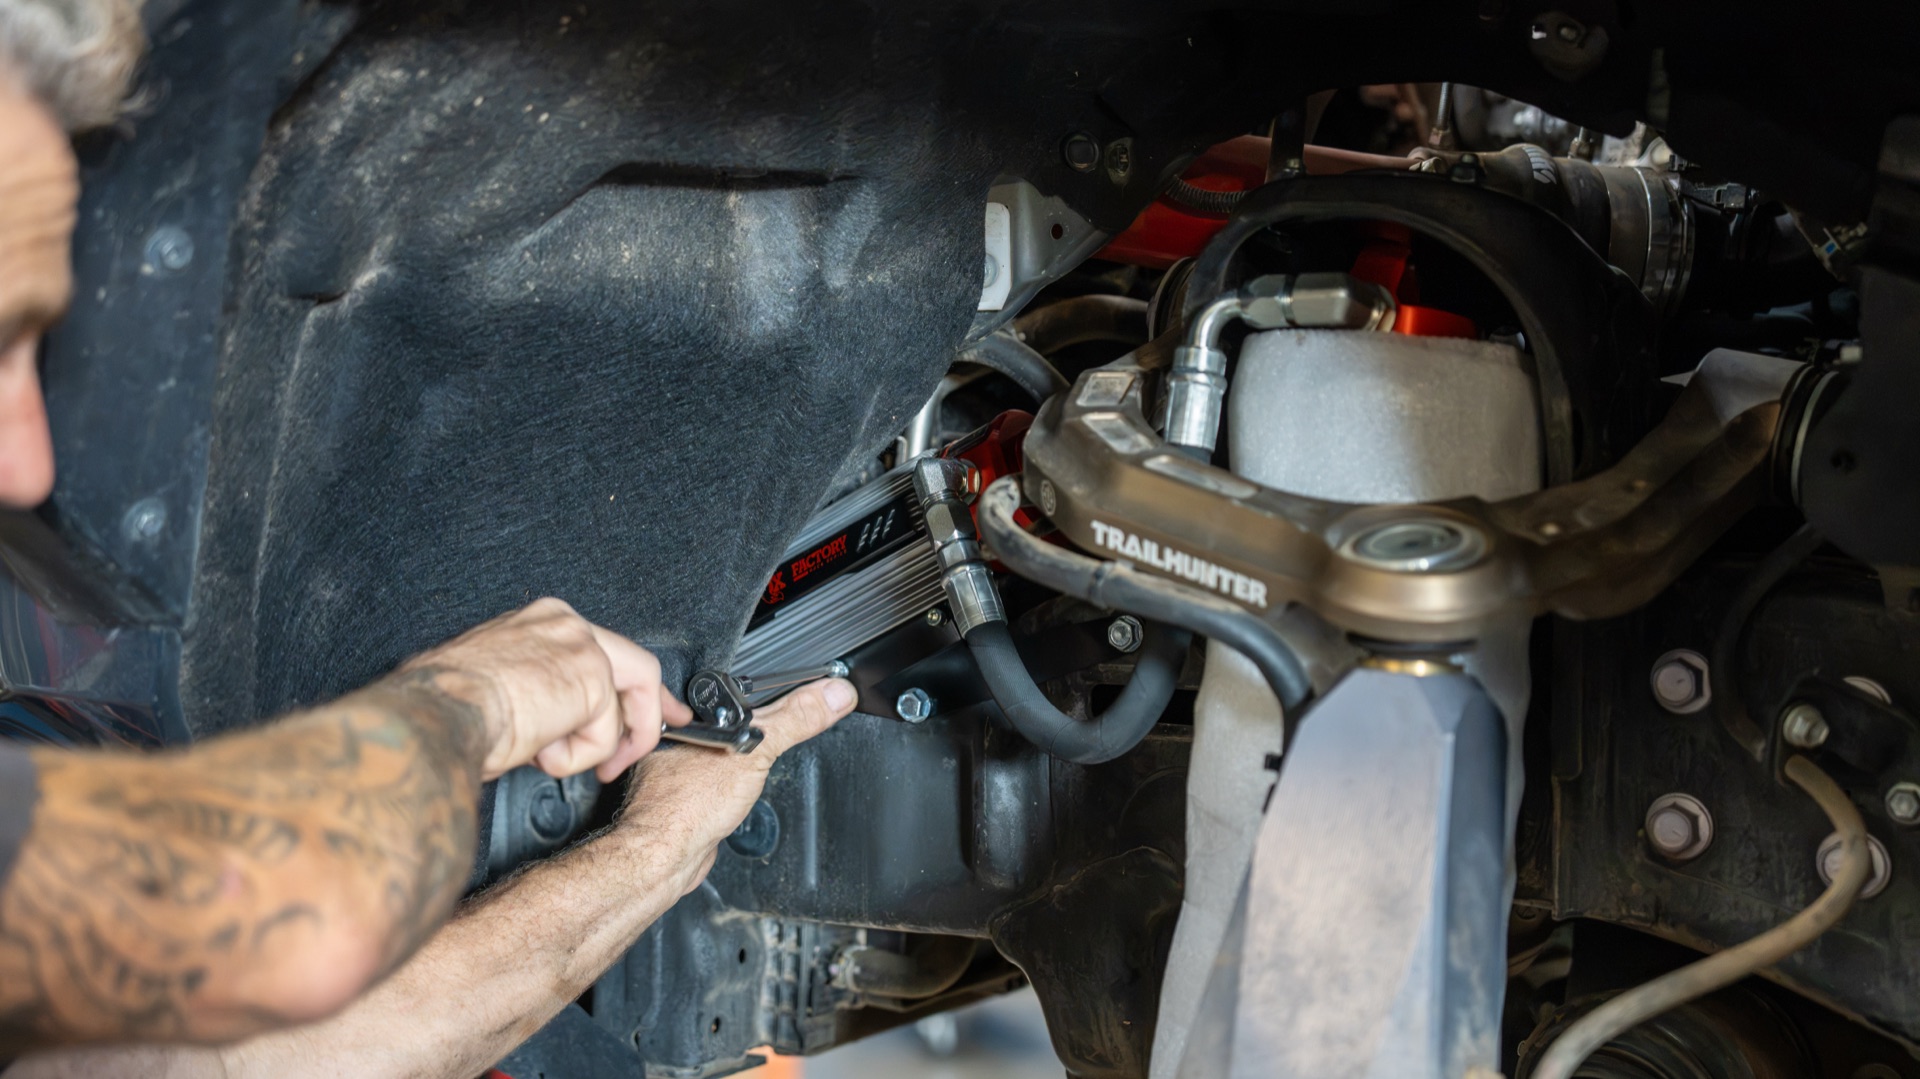
Reservoir bracket: remove the splash guard in the wheel well. Line up the resi bracket with existing holes in the frame rail. Fasten with supplied self-tapping screws. Slide clamp nuts into the rear dovetail slot, mount the reservoir, torque clamp bolts to 76 in-lb. Minimum 1/8” clearance from other components.
Rear removal: same pattern. Unbolt lower shock bolt, then upper. Stock shock comes out.
Rear install: thread lock both bolts. Install shock with reservoir pointed forward. Sandwich the upper stem top mount with two rubber bushings. Install washer and nut, tighten until 3-4 threads show above the nut. Seat the lower eyelet with a dead blow hammer. Torque to spec.
Rear reservoir bracket: mark 5-3/4” rearward from the bump stop bracket bolt, then 1-1/4” from the top of the frame rail. Punch hole locations, drill with a 13/64” pilot bit. Fasten with self-tappers. Mount reservoir with dovetail clamps, torque to 76 in-lb.
Straightforward if you’ve done a coilover swap before. Plan for about 3-4 hours on the mechanical side.
Install: electrical (the real job)
Fox’s electrical install video runs nearly 19 minutes. And they’re not wasting time.
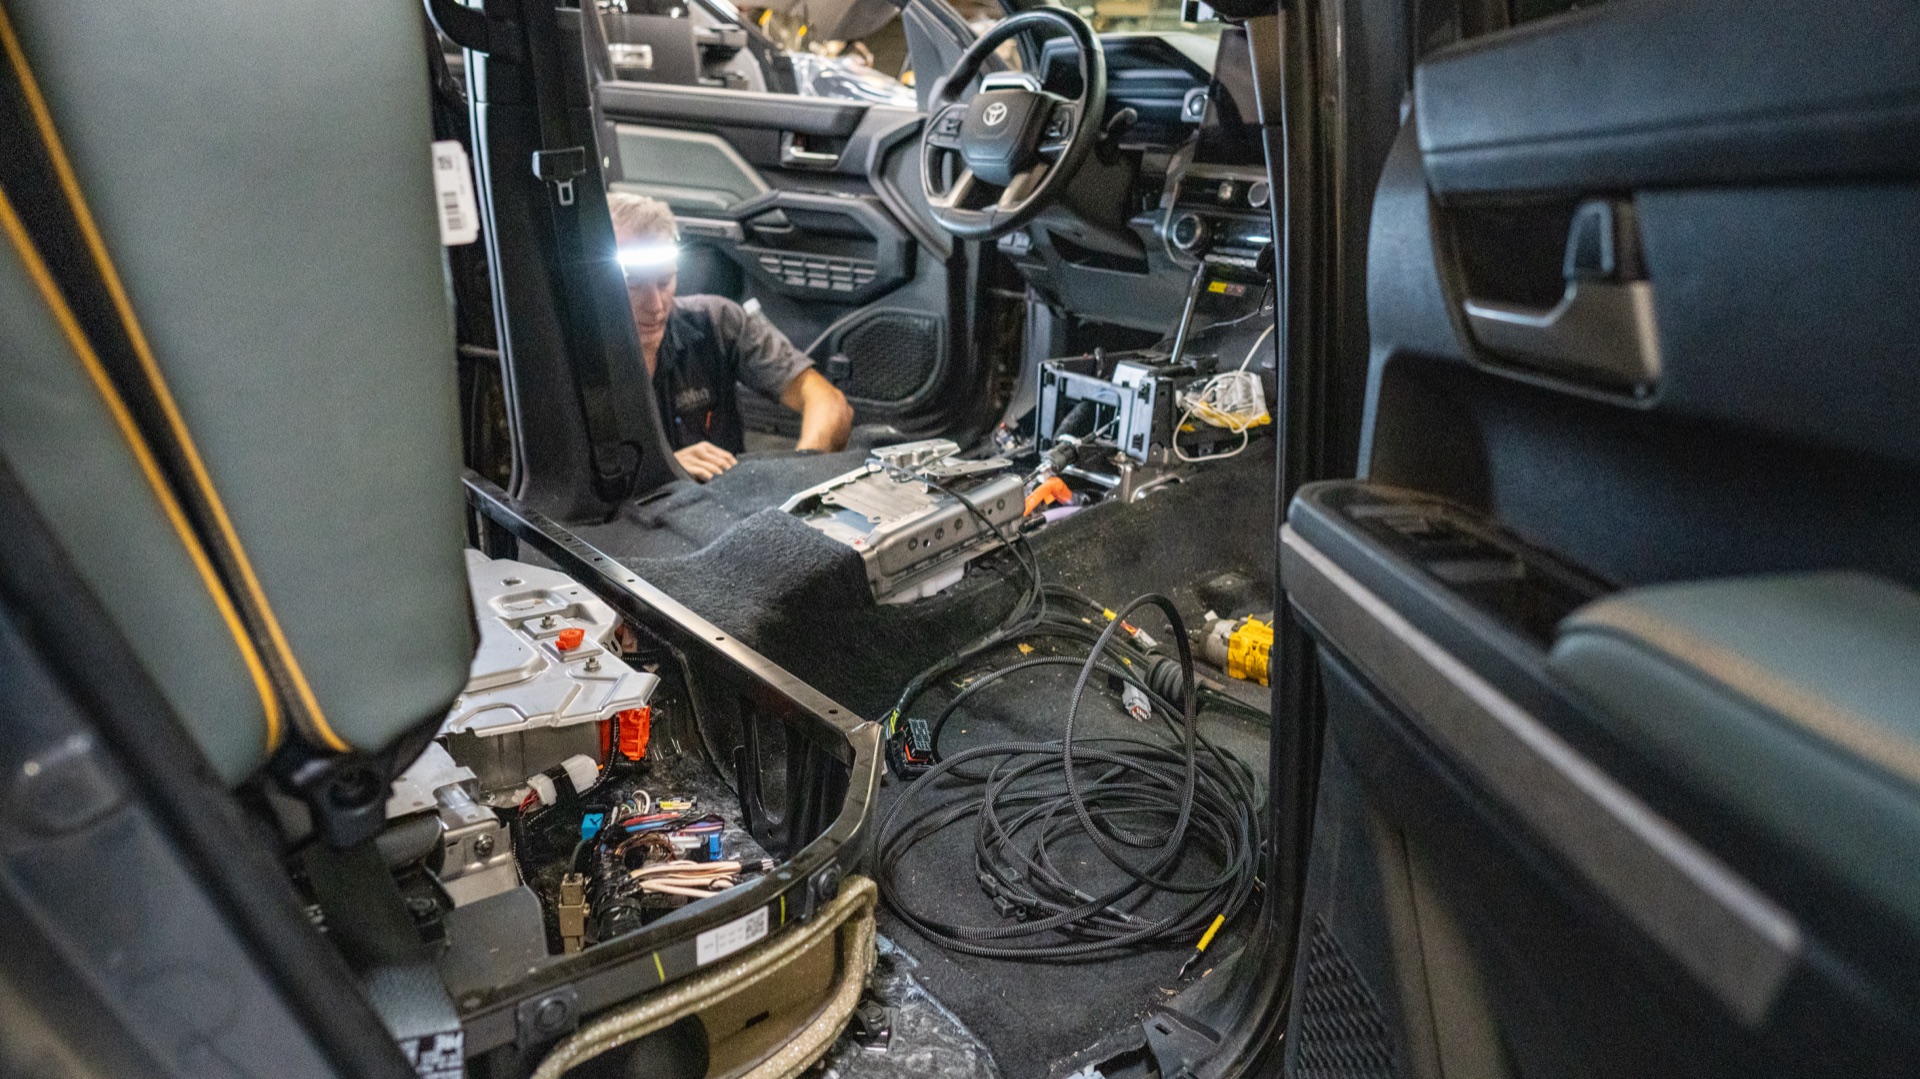
For the hybrid Tacoma, you start by flipping up the rear seat and disconnecting the negative terminal on the hybrid battery. Then the interior disassembly begins.
What comes apart: rear door sill trim (both sides). Trim under the rear seat. Center console trim panels on both sides. Gear selector knob and trim. Center console storage compartment. Both front seats (four bolts each, disconnect electrical connectors underneath). Driver and passenger door sill trim. Carpet latches so you can peel back the carpet and access the cab floor.
That’s a lot of interior to pull. And there’s a reason for all of it.
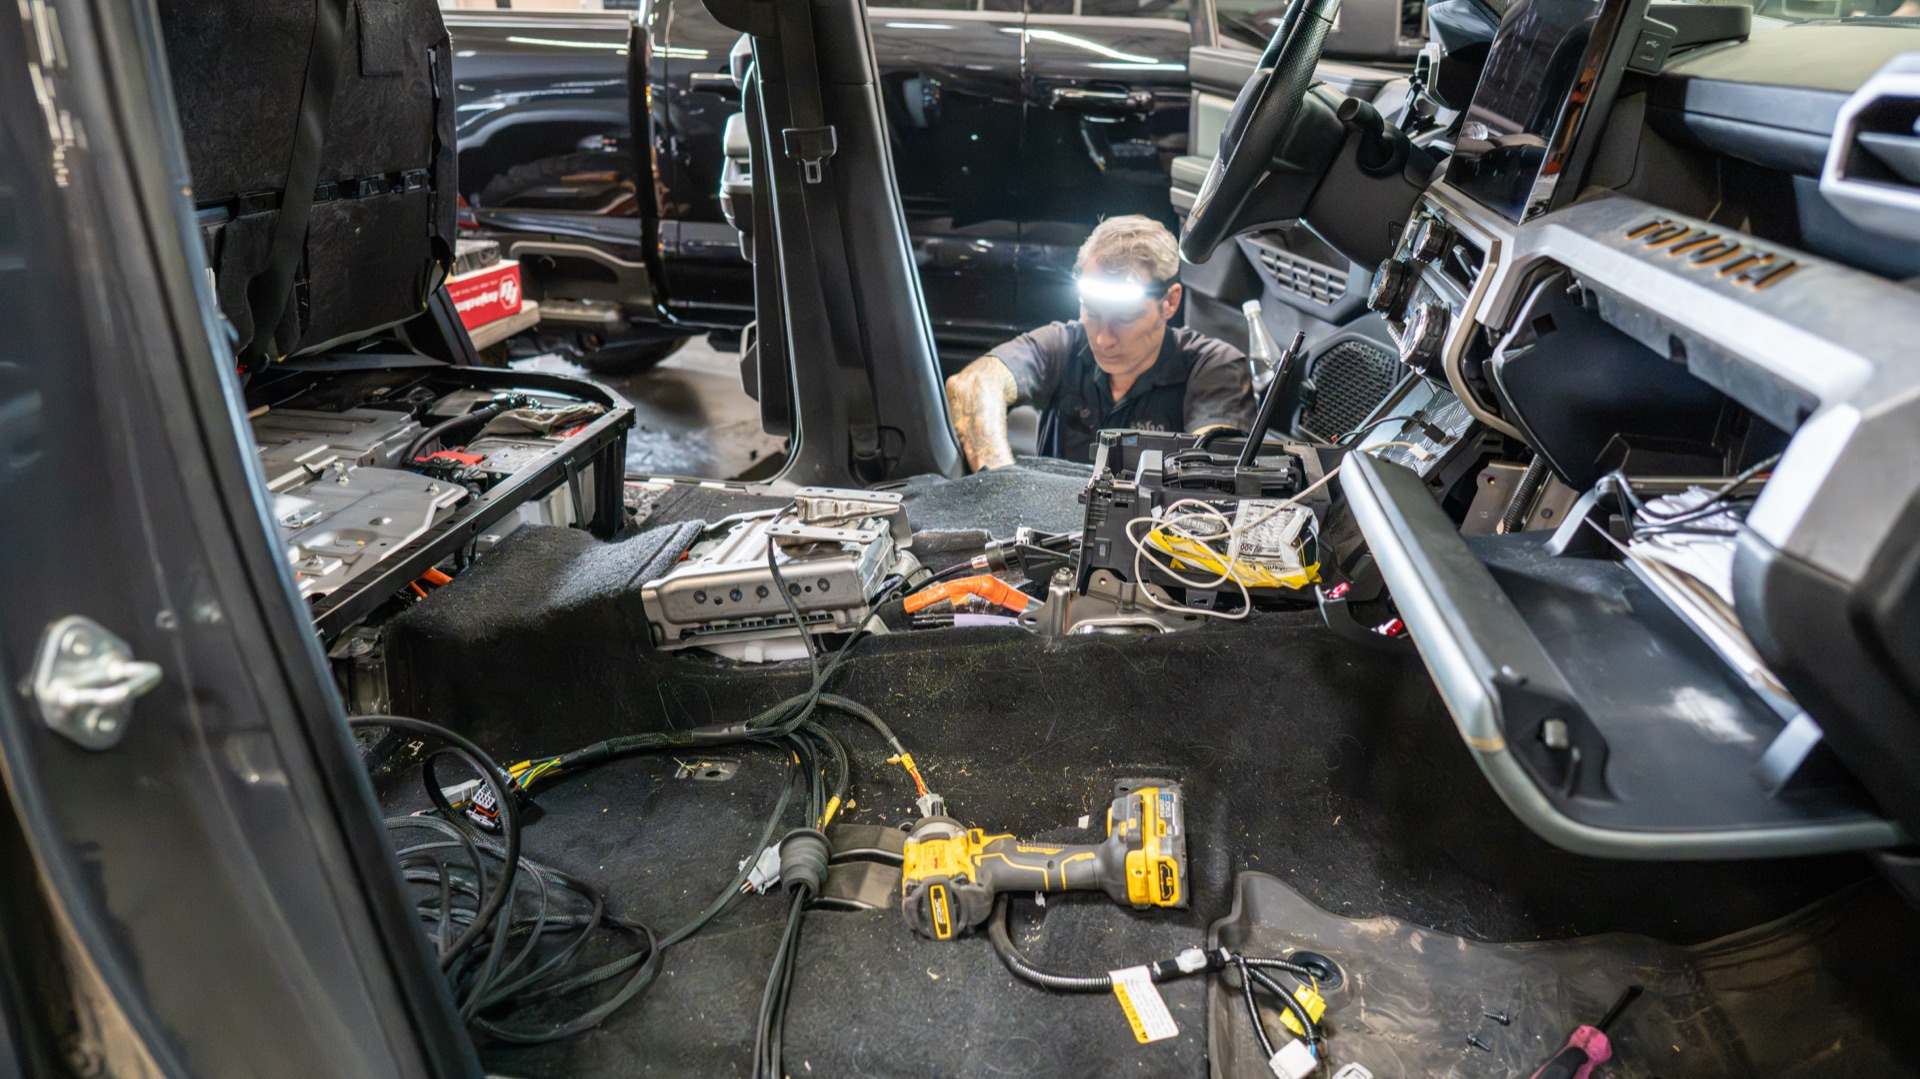
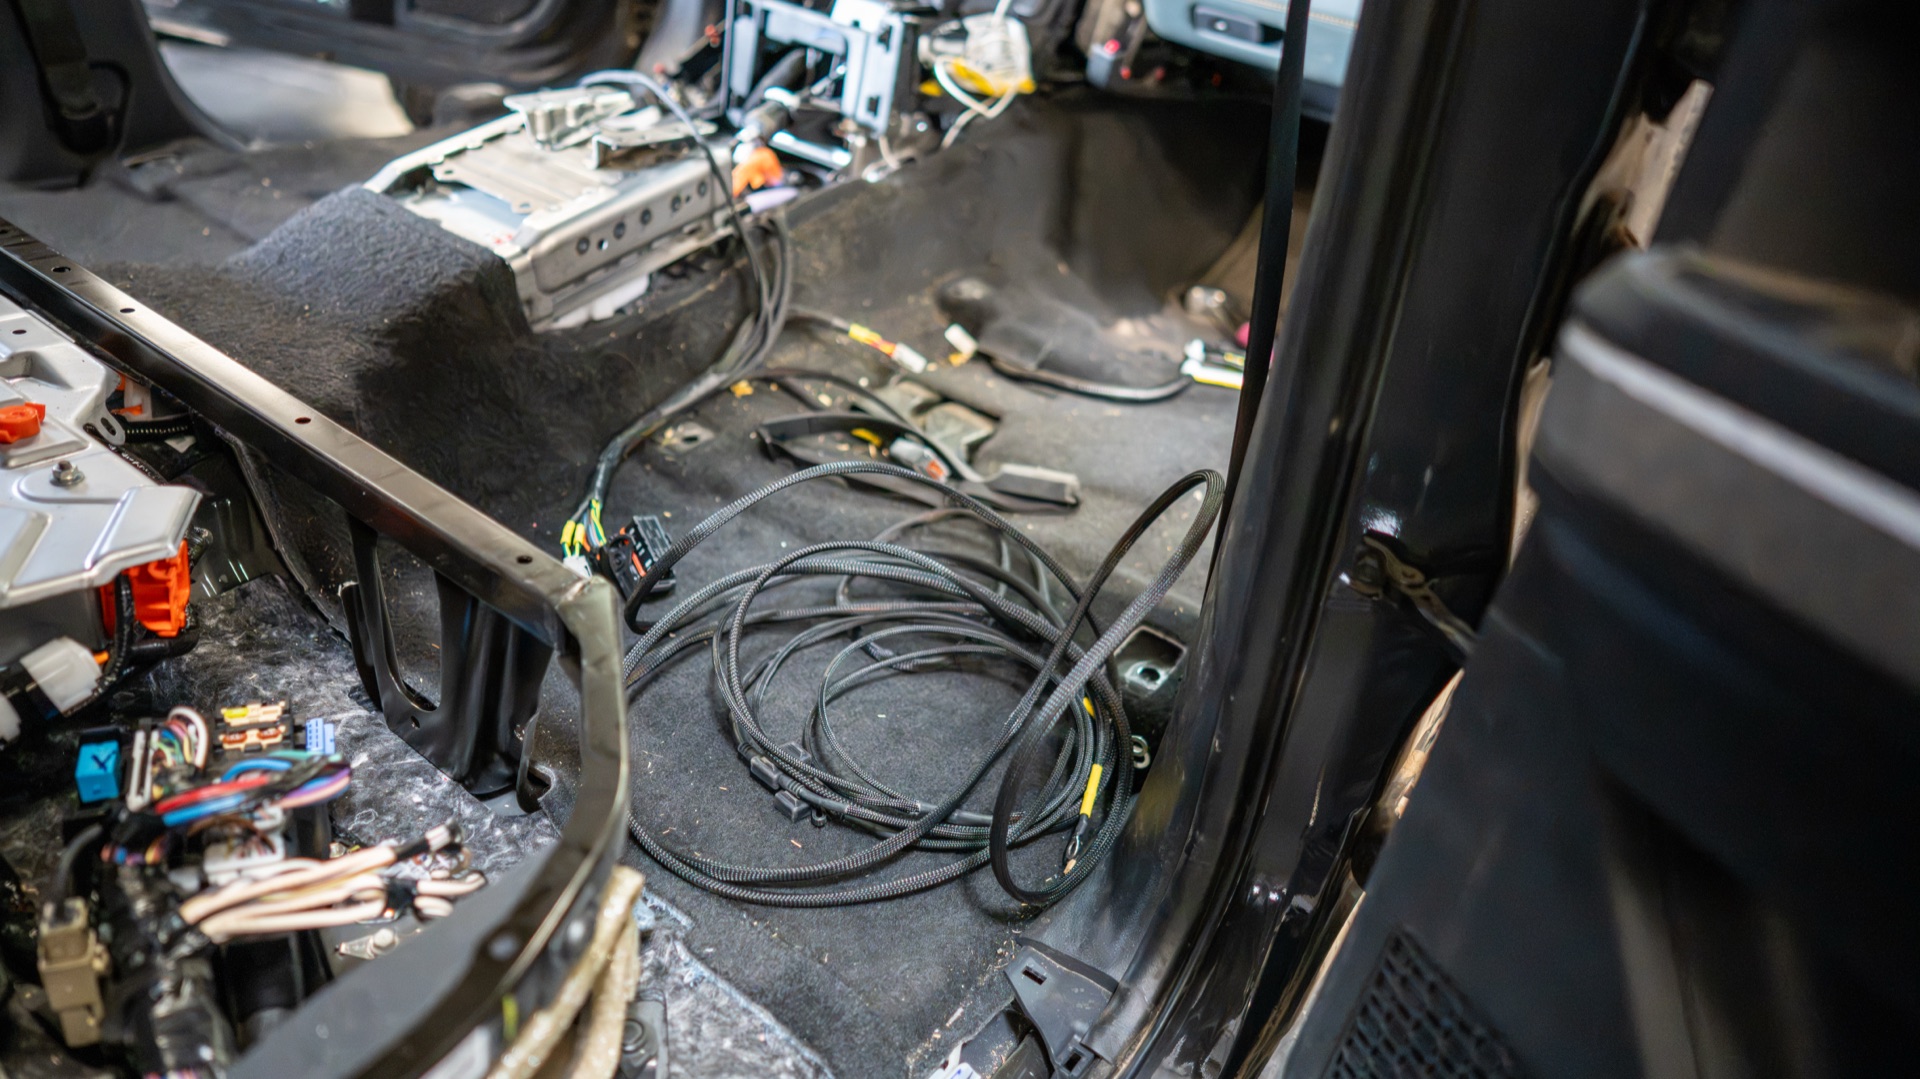
Cable routing: Fox’s wiring loom runs from the center console down through holes in the cab floor, then splits to all four corners of the truck via the frame rails. Driver side floor gets the FLC and RLC branches. Passenger side floor gets FRC, RRC, and the ignition fuse tap. You modify supplied grommets (cut the center out of a flat grommet, combine it with a boot-style grommet) to weatherseal both floor penetrations.
An existing ground cable runs through the passenger floor hole. You unbolt it, discard the OEM grommet, pass the cable through the Fox grommet, and rebolt to the frame rail. Details like this are why the video is 19 minutes long.
CAN bus tap: find the gray 34-pin connector in the front of the center console area. Disconnect it. Identify pin 25 (blue wire, CAN High) and pin 26 (white wire, CAN Low). Place both wires into the CAN sensor housing, making sure they’re fully seated in the foam for proper contact. Reassemble. Zip tie the sensor to the vehicle’s wiring.

IMU installation: mount the IMU to its bracket (white cover down, connector away from tabs, 70 in-lb). Locate the mounting spot on the center console. Apply double-sided tape. Plug the IMU into the branch labeled “IMU.” Bundle excess cable with zip ties under the shifter cable.
That is the video version. On my truck the IMU setup was nowhere near as simple as double-sided sticky tape, and SDHQ ended up fabricating a custom mounting solution to get it seated properly.
ECU installation: mount to its bracket (connector away from mounting tabs, 70 in-lb). Install the ground ring terminal on the stud to the left of the connector. Route the ECU cable run under the carpet and through the driver’s side floor hole. Position the bracket so it lines up with the front seat bolt holes. When you reinstall the driver seat, the seat bolts thread through the ECU bracket on their way back into the floor.

Frame rail routing: RLC runs down the driver side frame rail to the rear shock. FLC runs up the driver side frame rail to the front shock. RRC crosses under to the passenger side rear. FRC goes forward to the passenger front. Each branch connects to its shock’s solenoid. Zip tie everything to the frame at regular intervals.
Power connection: route the power branch from the center console under the carpet rearward to the hybrid battery compartment. Ground ring terminal goes to the negative terminal. Two power ring terminals go to the positive terminal. Reassemble the fuse block.
Ignition fuse tap: route the ignition branch into the engine bay. Open the fuse box, locate slot F5. Remove the 5A or 7.5A fuse (varies by trim). Plug that fuse into the lower slot of Fox’s ignition fuse tap. Insert the fuse tap into F5. Close the fuse box.
Pairing: reconnect the battery ground terminal. Mount the mode selector. Press start/stop 11 times (foot off brake, engine been off for at least 1 minute). Mode selector: hold left paddle down and right paddle up for 3 seconds. On-road icon flashes blue during pairing, settles to orange and white when paired. Same 11-press sequence pairs the Fox Connect smartphone app.
Fox’s videos make 5-6 hours feel realistic for the electrical install if you’re methodical. It’s not technically difficult, just tedious. Lots of trim removal, lots of harness routing, lots of reassembly.
Reality on my truck ran much longer. SDHQ put about 19 hours of labor into getting all of the wiring done, ripped the entire interior out of the hybrid, and fabricated that custom IMU mount along the way. Plan for double that if you DIY, and budget $2,000 to $4,000 in labor depending on the shop.
Fox Connect app
Fox Connect earns its own section. It gives you:
- Real-time telemetry: vehicle speed, steering angle, throttle, suspension compression displayed live
- A vehicle behavior widget showing which parts of the Live IQ algorithm are active as you drive (acceleration, braking, cornering, internal bypass, vertical G)
- GPS-mapped ride data you can record, review, and replay
- Over-the-air updates so Fox can push new features and tuning profiles to your ECU after purchase
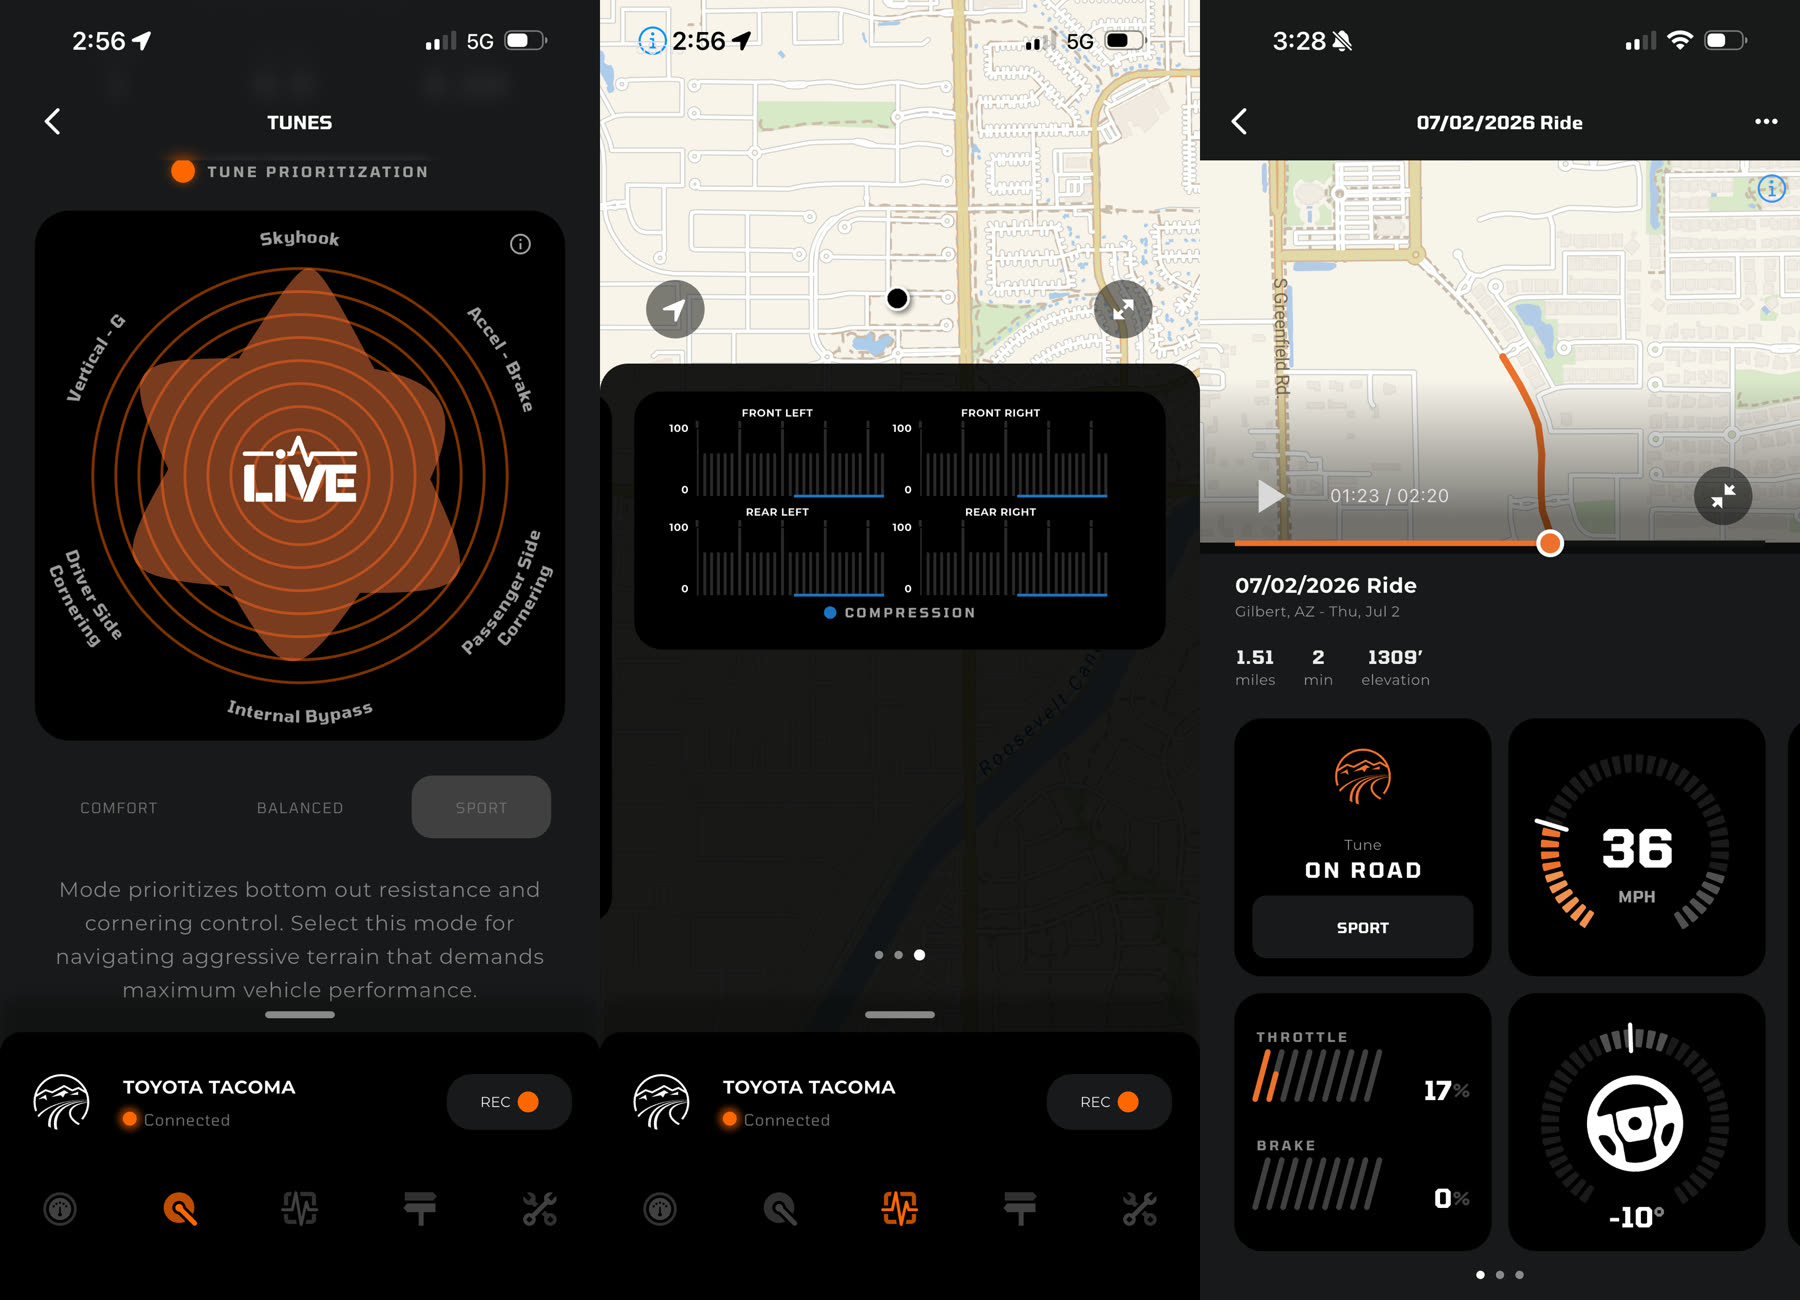
Software-defined suspension means the kit gets better after you buy it. OTA updates are something the Tacoma community has never had access to on an aftermarket suspension product.
Is $8,500 worth it
I don’t know yet. Ask me once real miles are on it.
What I can say: this isn’t just a nicer shock, it’s a different category of product. Four internal bypass shocks plus a full electronic control system that adjusts every corner on its own, hundreds of times a second, off what the terrain and your inputs are actually doing.
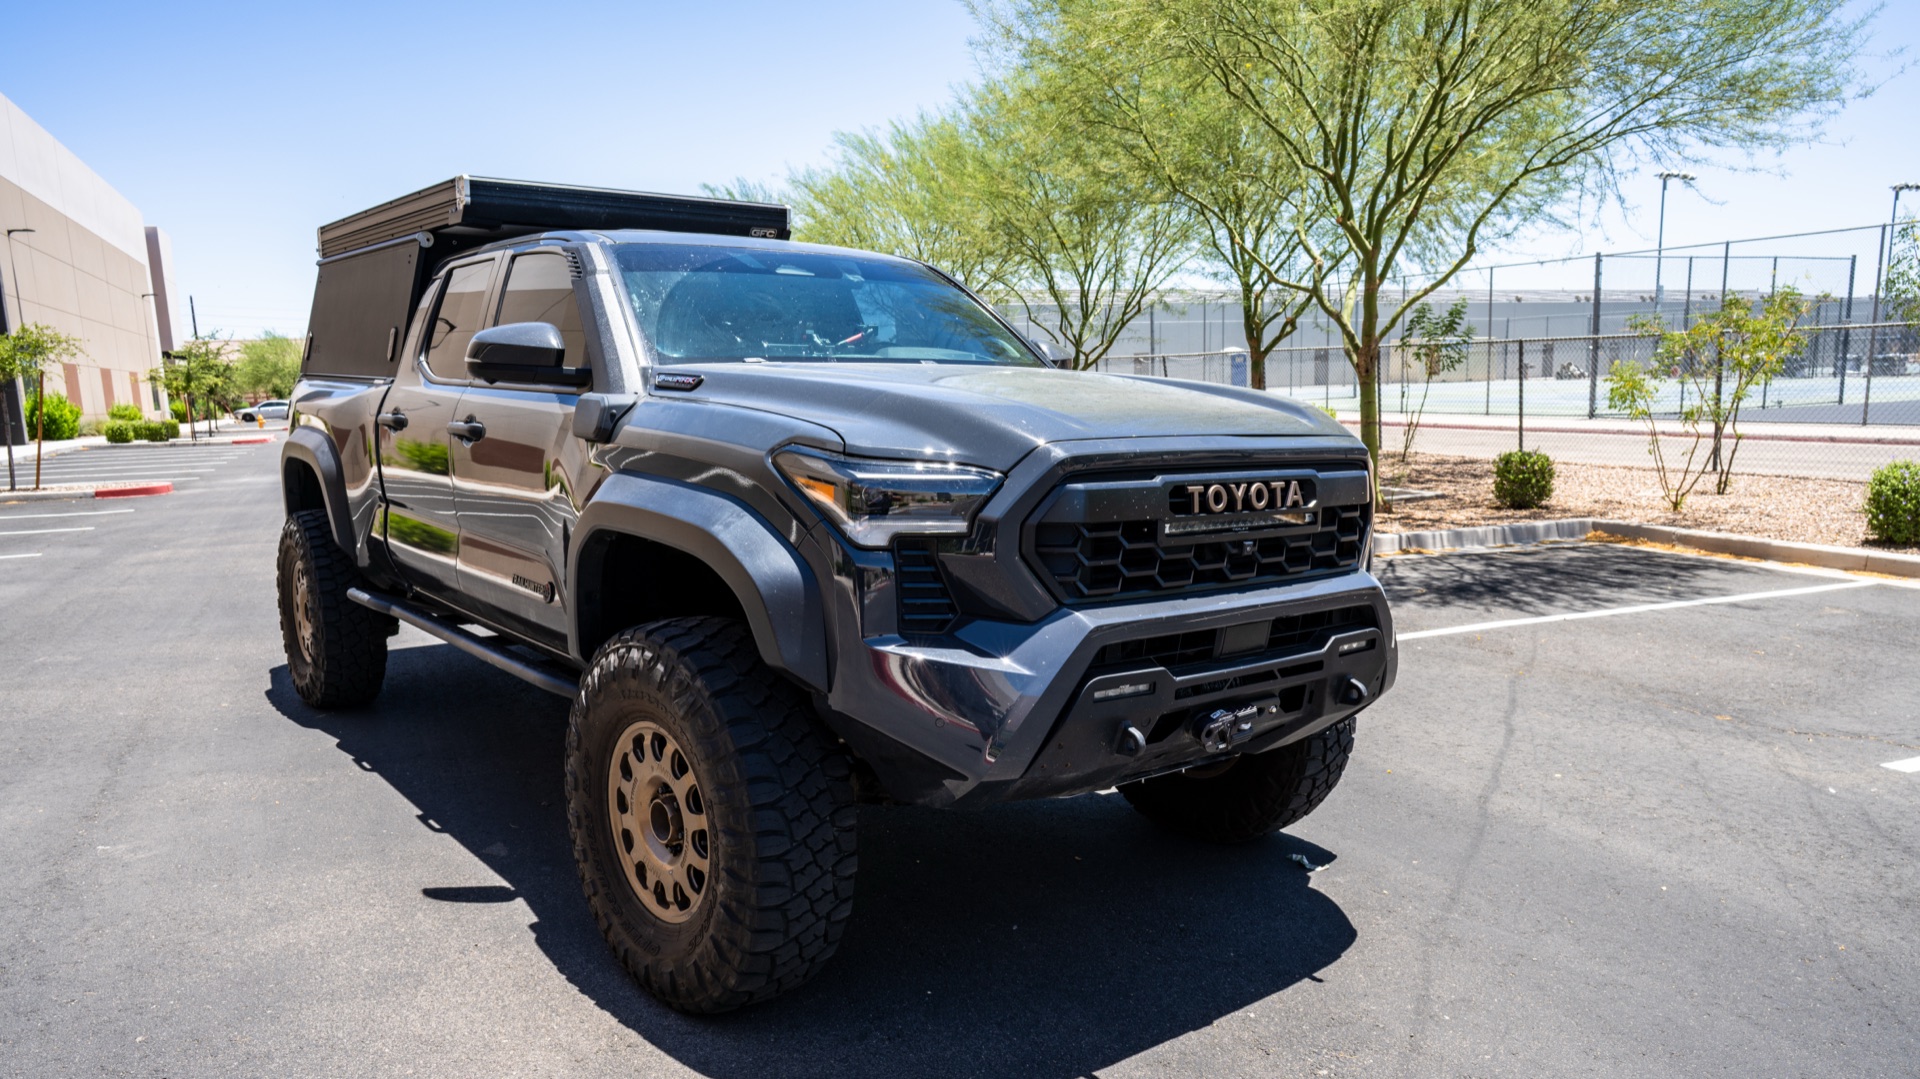
For a Tacoma that only sees pavement, it’s a tough sell. For a truck that crosses highway, gravel, rock, and sand in one day, the math gets interesting. My Trailhunter rides on 74Weld portal axles and 37-inch Toyo RT Pros. Performance is the priority, not looks. That’s why I’m spending my own money to find out if it’s real.
What owners of the same shock report
No other Tacoma owner has documented this install yet, so the closest real-world data comes from Raptor owners running the same 3.2 Live Valve hardware.
One Raptor owner who swapped to the 3.2 kit described a night-and-day change after running it loaded at highway speed and through deep sand whoops. In his words, “the difference between the stock shocks vs these new ones is wild,” and a few hundred miles in, “so far, these are all worth the money to me.” One caveat: his truck already came wired for Live Valve from the factory, so his swap was far simpler than this Tacoma retrofit, where the entire electronic system goes in from scratch. You can read the thread on the Ford Raptor forum.
Not everyone is sold. A Raptor R owner running the 3.2 Race Series Live Valve front and rear said flatly he was “not happy with the valving nor adjustments,” and is planning a revalve with stiffer rear coils, per his race-deZert post. A real-world version of the fixed-base-tune limit from earlier.
That was the honest tension going into my install. On the Raptor platform, the hardware has years of real-world miles behind it. Whether Fox’s Tacoma tune nails it on portal axles and 37s is exactly what part three has to answer.
What’s next
This is part one. Understanding the system before it went on the truck.
Part two is the install writeup. SDHQ handled the work and documented the process. I’ve worked with them on this build, and they’re the right shop for a job that involves portal axles, Live Valve electronics, and a hybrid powertrain all on the same truck. Real photos, real torque specs, real problems if they come up.
Part three is the review. On-trail data. Highway comfort before and after. How Live Valve behaves on portals, which nobody has tested. Washboard at speed. Rock crawling at idle. And an honest answer to whether $8,500 actually changed how the truck drives.
I’ll update this article if any technical details change once the install manual ships. Right now, Fox’s YouTube videos are the only official Tacoma-specific documentation available.
All technical details in this article are sourced from Fox’s official install videos: Shock Install and Hybrid Electrical Install. Full credit to Fox for making these public. Pricing ($8,495.95 MSRP, 2-3 inch lift) and specs from ridefox.com. Photos of my truck were shot by the crew at SDHQ Off Road during the July 2026 install. I paid for everything myself and have no affiliation with Fox.